Thursday, June 18, 2015

Chocolate Sour Cream Cake with Peanut Butter Frosting

So, I bought this antique cake plate that I LOVE and it was just begging for a cake. I was going to make one of my go to cake recipes, but I decided to switch it up and combine two of my very favorite flavors - chocolate and peanut butter. 

This cake it one of my favorite recipes for a from scratch chocolate cake - it's moist and so flavorful. Even if you don't like a peanut butter frosting, file this cake recipe away! You can use it with just about any frosting and it's always great.

And speaking of this frosting...wow. It's one of my favorites. You'll notice that I always make a LOT of frosting. I pack up the extra in a storage container and whoever wants more can add some to their slice!


Chocolate Sour Cream Cake with Peanut Butter Frosting
Source: JennaBlogs.com

For the Cake:
3 cups all purpose flour (plus extra for pans)
2 Tablespoons cornstarch
1/2 teaspoon baking powder
2 teaspoons baking soda
1/2 teaspoon salt
1 cup cocoa powder
1 cup boiling water
2 sticks unsalted butter, softened to room temperature (plus extra for pans)
2.5 cups white sugar
1 Tablespoon vanilla
4 eggs
1 cup sour cream (light sour cream is fine)

For the Frosting:
1.5 pounds of powdered sugar (I buy the 2lb bag and use 3/4 of the bag)
2 cups creamy peanut butter
2 sticks unsalted butter, at room temperature
1/4 cup milk, plus more if needed


Directions:

Preheat oven to 350.

In a saucepan, bring water to a boil. Add cocoa and whisk until dissolved. In a mixer, combine butter and sugar. Add eggs and vanilla. Add cocoa. Add sour cream. Mix well.

In a bowl, combine flour, cornstarch, soda, powder and salt. Add in batches to wet mixture, stirring to combine.

Use extra butter to coat two 9" round pans. Be sure to get the sides! Add a couple of tablespoons of flour and rotate the pan to coat. Tap out extra over a trash or sink.

Divide batter evenly between the two pans. Slap pans on the counter once to knock out air bubbles from cake.

Bake about 30 minutes, checking with a toothpick for doneness. I usually pull them out just before their done.

Remove from pans to wire racks and let cool completely.

For the Frosting:

In a mixer combine butter and sugar. Add peanut butter and milk as needed until desired frosting consistency is reached.

NOTE: When I make a cake like this, I usually frost the middle before adding all the milk. The frosting will be thicker and won't squish out! Once I've put the frosting in the middle, I thin out the remaining frosting with a little more milk for a more spreadable consistency.

Frost and serve! Store extra frosting in the refrigerator.


Monday, June 15, 2015

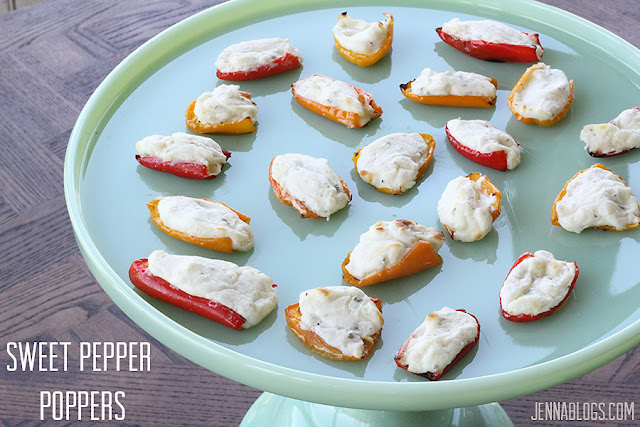
Sweet Pepper Poppers

My mom came up with this little gem and I CAN'T GET ENOUGH. 

Seriously, these are SO GOOD.

And if you think you won't like them because they have the word pepper, don't write them off yet. These are sweet peppers - there is no spice at all!


Sweet Pepper Poppers
Source: JennaBlogs.com

1lb sweet peppers
1 block cream cheese at room temperature
1 package ranch dressing mix (or buttermilk ranch mix)

Preheat oven to 425. Line a baking sheet with tin foil and spray with nonstick spray.

Chop the tops off the peppers (where the stem is) and then slice the peppers in half lengthwise. Remove the stems and the ribs.  Place in the oven for about 5-7 minutes, until the peppers are just starting to roast up.

In a bowl, mix cheese with ranch mix. Place cheese mixture in peppers and return to oven until cheese is melted and browned (about 5 minutes).

Serve warm or at room temperature.


Thursday, June 11, 2015

Our trip to Magnolia Market, Junque in the Trunk & Harp Design Co.

Raise your hand if you're a fan of Fixer Upper!

Alright, so I'm assuming you all raised your hands! If so, this is the post for you!

Last week, we decided to take an impromptu trip to Waco, Texas. Why would we want to visit Waco? Well, solely for Magnolia Market, Junque in the Trunk and Harp Design Co., of course!

Waco is about 8+ hours from where we live, so we actually drove to Grapevine first, but that is for another post.

Our first stop was...


 I mean really, where else did you think our first stop would be? ;-)

Magnolia Market is currently located in what I would say isn't the best area of Waco. That was just my impression, but I could be wrong! Certainly the way we drove in made it seem that way. There also isn't any parking, so you utilize the parking lot for the business next door.


You're greeted at the door with this adorable water stand. Love!

We got there right when they opened, which is exactly what I would recommend you do if you're thinking of visiting to Magnolia Market. By the time we left, the place was absolutely packed!


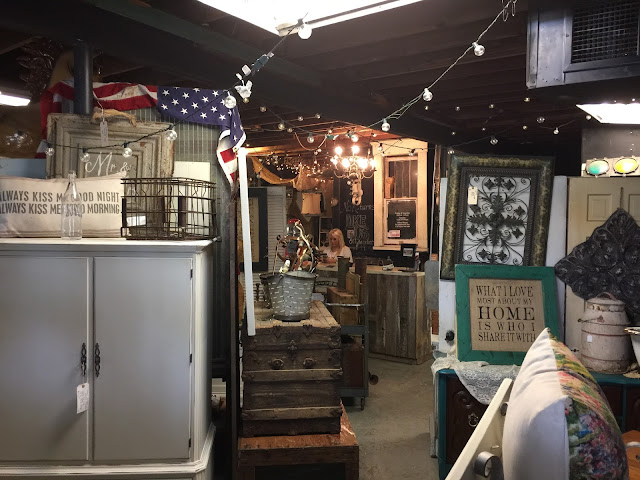
I'm including lots of pictures so that you can see what the whole store looks like. It's pretty small, and I'm sure the new one will be a lot larger!
Everyone who works there is so helpful! See that gray ladder above? I might have come home with that.
 I might have also gotten a few of the things in these pictures as well. I'm working on some remodeling projects that I can't wait to show you!


There is also another building that is detached but just steps away from the main Magnolia Market. It looks like this:


Inside, there is a lot of dead space - I'm not sure if they were just sold out of a lot or what. There were some dishes, fake flowers, Joann's jewelry and galvanized buckets.

It was great to visit! I was surprised to see that almost everything is available online, only because I never felt that their website was that large. Hopefully they will up their number of SKU's when their new store opens. My only other criticism is the pricing. It was the first store of our very long day, so I bought things that I later found for much cheaper.


Next up was Junque in the Trunk, which you might remember from season 2 of Fixer Upper. 


I absolutely loved this store! In my head it was a lot bigger, not that it was small in person. 


I might have brought something from the above picture home with me. Any guesses?

I chatted quite a lot with the owner and found out that she went to school with Joanna and that they are friends. She's also recently engaged and she loved my ring, so she snapped some pics of it which was flattering!


They also stock a lot of the same accessories - I know I saw the bread holders and galvanized buckets here for much cheaper.

You can shop on their Facebook page, so be sure to look for that!


Our last stop on the Fixer Upper part of our day (we visited probably 10 other stores outside of these three!) was Harp Design Co, which is conveniently located right next to the Harp's House...which of course, was featured on Fixer Upper!


Funny story - the Harp's were home and we saw them outside! 


I love everything they show on Fixer Upper, so I had pictured a large showroom. In actuality, the showroom was quite small and very empty. There was one piece I was interested in (a bench) but it was already sold. They had no inventory in the back to sell. Interestingly, it seemed like all of the big pieces in the store had already sold.


Overall, we had a great day in Waco, and loved getting to see the places that are often shown on our favorite TV show! 

Monday, June 8, 2015

Last Day of School!

Well, school is out!

The school my kids go to actually ended in May, so we've been out for two weeks now. We took a little impromptu trip last week which I can't wait to blog about. We visited Magnolia Market for all of those Fixer Upper fans!

But before I get to that, I had to share a little about my two main boys.

Brayden finished up Kindergarten. Unlike a lot of my friends schools, ours doesn't do a graduation with caps and gowns and all of that (which is a little sad for me) but they do a program where they sing and we watch a video of pictures of all the kids from the school year. 


I am amazed at what he's learned this past year!

He can read easy reader books, write full sentences, do addition and subtraction and even play math games on his computer. He has grown so much! He's much more outgoing and every kid in his class loved him, which is so fun for me to see. He makes friends so easily and has such a sweet spirit. He received an award for his love of God's word - he had memorized a Bible verse every week of the school year!


Brody attended Pre-K 3 this year, and we lucked out - he was able to be in the same class his brother was in when he attended Pre-K 3. We absolutely love his teacher!


Brody has always been very outgoing, so it was no surprise that he made fast friends with everyone in his class (and several of the other classes!). He has learned a lot, including how to write his name. He loves coloring, recess, library and story time. He also loves Wednesdays (he only goes 3 days a week) because they are Chick-fil-a days!


We are looking forward to a fun filled summer, and I hope you are too! I'll be back later this week with pictures of our trip to Waco and Grapevine. We visited Magnolia Market and several other shops that you've seen on HGTV if you're a fan of Fixer Upper!

Tuesday, June 2, 2015

How To Make A Culvert Garden Planter

A couple of months ago I dreamed up these planters. Thankfully, I have an awesome husband who can whip this sort of stuff up for me. I posted some pictures on Twitter and Facebook (and I'll be posting some on my new Instagram account too!) of my garden and people wanted to know more about the raised planters I'm using. 


So, here is what they look like. I've got five of them made out of leftover culverts we owned and weren't using. Culverts are big drainage pipes that are used underground to carry water. Now, I'm sure not everyone has these just laying around, but you can check Craigslist and find them or call around and see if your city has any they want to get rid of. Otherwise, check with a plumbing supply house (not a Lowe's or Home Depot).


Here is what you will need:

Culverts (mine are 48" wide and 4' tall)
1 garden hose
1 roll of thin metal wire
Drill with 3/8" drill bit (or similar)
Razor knife
Level
Circular saw/sawzall/plasma cutter (one of the three)
Paint (if you're using a galvanized pipe, you'll need to make sure you have paint that will stick to galvanized metal)
Creek or clean gravel - enough to fill up half of your culvert
Garden grade dirt - enough to fill up the rest of your culverts


Directions:

1.) Measure and mark your culverts for cutting.

2. Cut your culverts to length using a circular saw with a metal blade, a sawzall or a plasma cutter if you have one.

3.) Paint the culvert. Let dry completely.

4.) Using your knife, cut a slit through one side of the garden hose (not all the way through it - it should remain in one piece) so that it will wrap around the top of the culvert (see picture below).

5.) Place garden hose on top of the pipe as shown below.

6.) Drill a hole right below the garden hose every 10-12".

7.) Thread metal wire around garden hose, through the hole you just drilled and tighten (shown below).

8.) Set your culvert in place and make sure it is level, side to side and front to back.

9.) Fill your culvert halfway with gravel. ***If you're only using these to grow shallow plants, like herbs, you can use more gravel and less dirt which will be less expensive. ***

10.) Fill remainder of the culvert with garden dirt leaving about 4" of space at the top.

11.) Plant your garden!


Here is one of my planters - this one has potatoes and onions! These planters are GREAT for anything that will grow down into the dirt like carrots, onions, garlic, potatoes, turnips etc. 

Let me know if you have any questions!


Related Posts Plugin for WordPress, Blogger...
 
Blogging tips